- 1800 717 710 | Newsletter |
- FAQ |
- Contact
-
0 product
My Cart - Quick Order
- Home>
- Brands>
- Manfrotto Lighting>
- Lighting>
- Lighting Supports Accessories>
- Pump Cup>
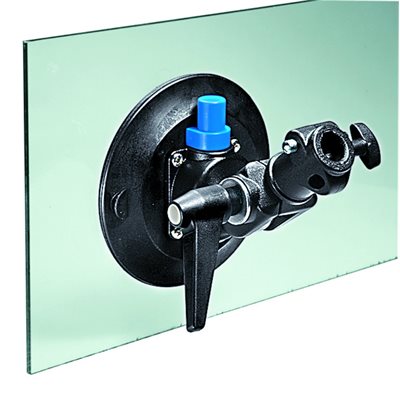
- Manfrotto 241 Pump Cup with 16mm Swivel Socket
Manfrotto 241 Pump Cup with 16mm Swivel Socket
Product code : MAN.241
UPC code :8024221040494
Manfrotto 241 Pump Cup Swivel Socket
The Manfrotto 241 Pump Cup features a 16mm Swivel Socket.
Suction pump cup is used for mounting small fixtures and lightweight equipment.
Equipment mounting via a 16 mm bushing with safety pin.
Pump cup with 16mm (5/8'') socket
Suction cup for small fixtures and lightweight equipment
Max payload 2Kg
Incorporates safety pin for extra security
Suction cup for small fixtures and lightweight equipment
Max payload 2Kg
Incorporates safety pin for extra security
Accessories visible on product image are not included
To use an Avenger F1000 Pump Cup, which is a powerful suction cup mount, follow these steps:
Ensure Clean and Smooth Surface: Start by selecting a clean and smooth surface where you want to mount the Avenger F1000 Pump Cup. It should be free of dirt, dust, and any debris that could hinder suction.
Prepare the Pump Cup: Before attaching the Pump Cup to the surface, inspect it for any damage or wear. Make sure the rubber cup is in good condition without any cracks or tears. This ensures proper suction and stability.
Position and Place the Pump Cup: Hold the Avenger F1000 Pump Cup by its handle or grip and position it against the desired surface. Ensure that the cup is centered and aligned properly.
Pumping Action: With the Pump Cup firmly pressed against the surface, press the cup against it to create a vacuum seal. Begin pumping the handle up and down vigorously. The pumping action removes air between the cup and the surface, creating suction. Pump until you can no longer can see the red line. If the red line appears you need to re-pump the pump cup.
Test the Suction: After several pumps, try to gently pull or tug the Pump Cup to check if it firmly attaches to the surface. If there is resistance and the Pump Cup holds its position without coming loose, the suction is successful.
Securing Equipment: Once you have established a secure suction, you can attach your equipment to the Avenger F1000 Pump Cup. It is commonly used to mount lightweight cameras, small lighting fixtures, or other accessories. Ensure that the equipment is securely fastened to the mount using appropriate attachments or brackets.
Monitor Stability: While using the Pump Cup, regularly monitor the stability of the mount and the equipment attached to it. Be cautious and avoid putting excessive weight or strain on the suction cup.
Releasing the Pump Cup: To remove the Avenger F1000 Pump Cup, release the suction by pressing the small release tab or lever typically located near the pump. This allows air to enter the cup and breaks the vacuum seal. Gently lift the Pump Cup away from the surface.
Clean and Store: After use, clean the Pump Cup with a mild detergent and water, ensuring it is free of any dirt or residue. Allow it to dry completely before storing it in a clean and dry environment.
Remember, proper surface selection, regular inspection of the Pump Cup's condition, and cautious use are essential for safe and effective utilization of the Avenger F1000 Pump Cup. Always follow the manufacturer's guidelines and recommendations for optimal performance and longevity of the equipment.
Please be aware that John Barry has multiple warehouse locations in different states.
If you wish to purchase in store, to avoid disappointment, please confirm the availability of the product at your local John Barry prior to visiting.
Alternatively, orders placed online by 2pm AEST are typically dispatched same day, if ordered online.
If your product is on backorder, please contact us for an ETA.
Shipping is done via Startrack Express or Australia Post eParcel service and tracking advice will be provided once shipped.
For more information, please visit our Shipping Policy.
John Barry Sales offers the same the warranty conditions as scheduled by the product manufacturer.
Should you have any questions regarding our equipment warranty conditions, please contact us
John Barry will happily exchange a product sold to you that does not match the description on our website, or if the product is not of an acceptable quality or condition for use.
John Barry reserves the right under Australian Consumer Law to refuse a request for an exchange or refund on all final sale items, if you have misused/mishandled the product, or if you have simply changed your mind. Please visit our Refunds & Returns policy page for further information.


